Fail2ban is an application which helps to protect your server from brute-force attack. It monitors the log file of the system and looks for the malicious activity. If malicious activity found like too many failed login attempts, it ban the IP address. It is an extremely helpful and must have application for a server.
Few days ago one of my server has compromised. I checked the log and found out an astonishing number of brute-force attacks were going on:
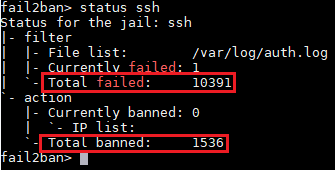
The server was up for only 11 days and 10,000+ failed login attempts already happened! Luckily, I installed fail2ban on ssh service right after I configured the server which prevented that enormous login attempts.
Let’s see how we can implement fail2ban on ssh service for CentOS 7 & RHEL 7
- Update the system
yum update -y
- Install epel repository where fail2ban included
yum install epel-release -y
- Install fail2ban
yum install fail2ban -y
- Start the fail2ban service and enable it for system startup
systemctl start fail2ban
systemctl enable fail2ban
- Add ssh service to firewall
firewall-cmd --permanent --add-service=ssh
- Restart the firewall
systemctl restart firewalld
Configuring fail2ban for CentOS 7
Now that we installed and configured fail2ban on CentOS 7, it’s time to configure it. Edit “/etc/fail2ban/jail.local” file with your favorite editor. I will use vi because it’s my favorite text editor (seriously).
vi /etc/fail2ban/jail.local
Modify/add the following lines:
[DEFAULT]
# Ban hosts for one hour:
bantime = 3600

# Enabling fail2ban for sshd service
[sshd]
enabled = true
Save and exit
Restart the fail2ban service.
systemctl start fail2ban.service
Verify
To see all the rules:
firewall-cmd --direct --get-all-rules
To see the list of banned IP
ipset list fail2ban-sshd
To find out all the failed login attempts
cat /var/log/secure | grep Failed
How to unban an IP
To unban an IP, follow the below steps
fail2ban-client status
fail2ban-client -i
status sshd
set sshd unbanip <banned-ip-address-here>