Site to Site VPN creates a private tunnel with a remote destination for transferring data securely. AWS provides managed VPN solution but if you want to configure NAT on top of it, you need to provision additional instance and make it NAT compatible. AWS provides a documentation on how to configure NAT for managed VPN
However, if the VPN solution is not managed then you can follow this tutorial to setup NAT traversing on your custom VPN CIDR. For this, I will use Openswan, an IPSec VPN for Linux.
We will use NAT to eliminate CIDR overlapping with a remote destination and alter the source IP.
Topology
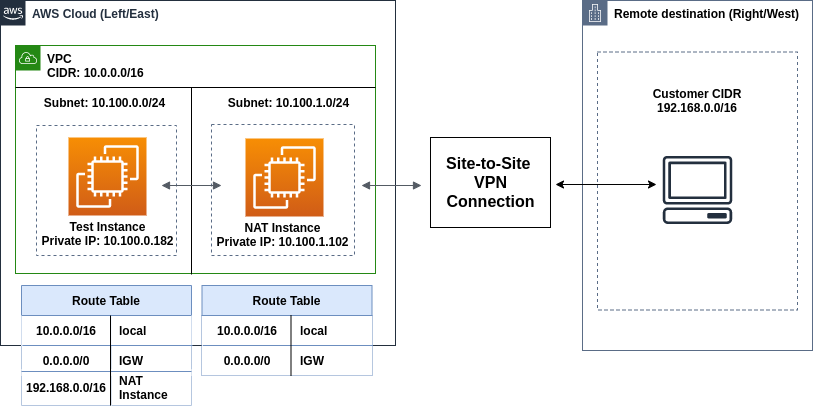
Overview
Suppose in remote/customer end, the CIDR block is 192.168.0.0/16. First, we will connect with that CIDR block from our AWS side.
In AWS, create a new VPC with CIDR 10.0.0.0/16.

Create an internet gateway (IGW) & attach it with that VPC.

Create two subnets: 10.100.0.0/24 & 10.100.1.0/24. One for the general instances and another one dedicated to NAT instance.

Now provision two EC2 instances in those subnets. I used Amazon Linux 2 as AMI and t2.micro as instance type. Also attach elastic IP addresses in both instances. Make sure to disable source and destination check of the instance that you provisioned in 10.100.1.0/24 subnet because we will use that instance as NAT.
As for the security group of NAT instance, allow UDP port 4500 & 500 and TCP 4500 from remote public IP.
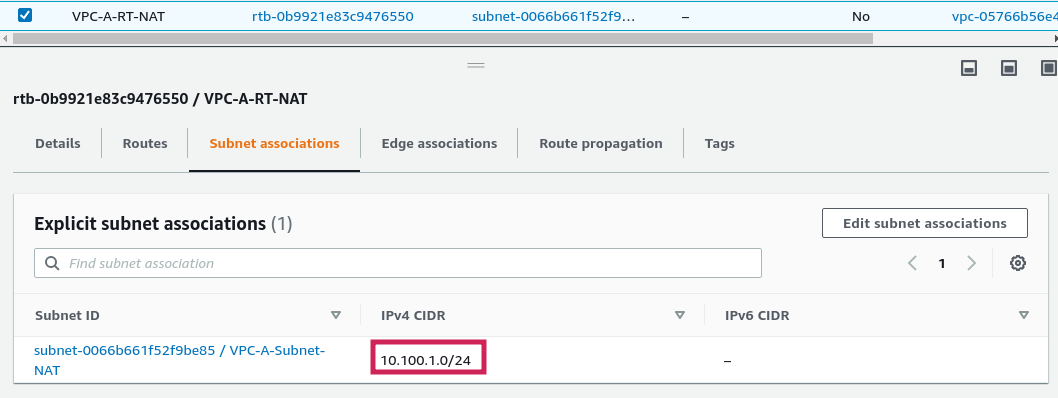
Now create two route tables. For the first route table, associate the subnet 10.100.0.0/24

Create the following routes. Note: Here eni-* is the network interface id of the NAT instance and destination is the remote private subnet. So all incoming traffic from 192.168.0.0/16 subnet will be transferred to the NAT instance for manipulating the packets.

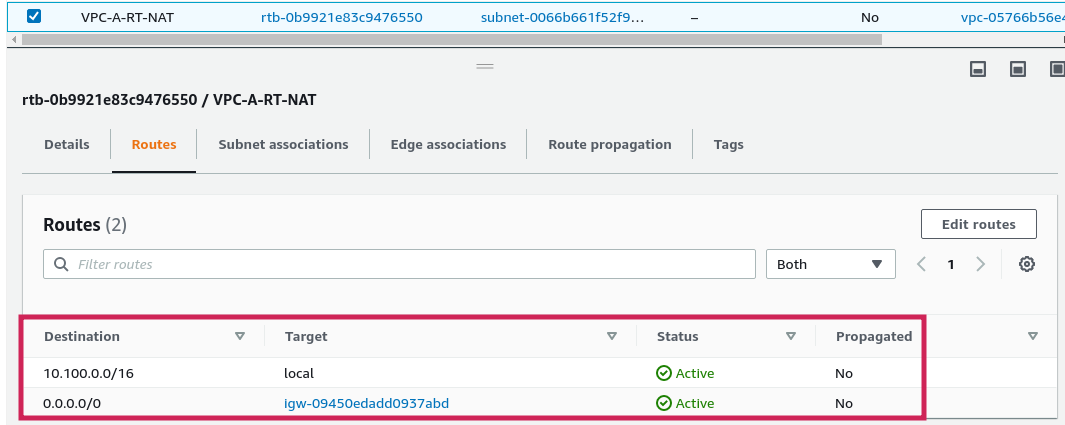
Again create another route table for 10.100.1.0/24 which will use for NAT instance. Associate the subnets and add the routes:
Topology setup is done.
Now from remote end, gather the following info:
- Remote public IP (Exm: 55.66.77.88)
- Remote private subnet (Exm: 192.168.0.0/16)
- Pre shared key (Exm: xKDJG/Ay28XdokbtC0gIMzDLdJJo)
Setting up VPN in instance
SSH into the NAT instance. Install Openswan and iptables packages
sudo yum install openswan -y
sudo yum install iptables-services -y
sudo systemctl enable iptables
sudo systemctl start iptables
sudo iptables --flush
sudo service iptables save
Modify the kernel parameters in order to allow IP forwarding and disable redirects. Edit /etc/sysctl.conf file and add below lines:
net.ipv4.ip_forward = 1
net.ipv4.conf.all.accept_redirects = 0
net.ipv4.conf.all.send_redirects = 0

net.ipv4.conf.default.send_redirects = 0
net.ipv4.conf.eth0.send_redirects = 0

net.ipv4.conf.default.accept_redirects = 0
net.ipv4.conf.eth0.accept_redirects = 0
Save and exit. Reload the rules.
sudo sysctl -p /etc/sysctl.conf
Edit /etc/ipsec.conf file and uncomment the following line if not already
include /etc/ipsec.d/*.conf
Now for configuring tunnel, always consider your side as left/east and remote end as right/west. Create a file in /etc/ipsec.d/aws-vpn.conf and paste the following:
conn Tunnel1
    authby=secret
    auto=start
    left=%defaultroute
    leftnexthop=%defaultroute
    leftid=<Public-IP-of-this-NAT-Instance>
    right=<Public-IP-of-remote-gateway>
    type=tunnel
    ikelifetime=8h
    keylife=1h
    phase2alg=aes128-sha1;modp1024
    ike=aes128-sha1;modp1024
    keyingtries=%forever
    keyexchange=ike
    leftsubnet=<Public-IP-of-this-NAT-Instance>/32
    rightsubnet=<Private-subnet-of-remote-side>
    dpddelay=10
    dpdtimeout=30
    dpdaction=restart_by_peer
At line 6, leftid=EIP of NAT instance and for line 7, place the public IP of remote gateway.
Also at line 15, place the EIP of the NAT instance and in line 16, place the private subnet of remote end. Save and exit.
Now for authentication, create a file in /etc/ipsec.d/aws-vpn.secrets, put the below line:
remote-public-IP NAT-EIP: PSK "pre-shared-key"
## Example
55.66.77.88 11.22.33.44: PSK "xKDJG/Ay28XdokbtC0gIMzDLdJJo"
Before starting the tunnel, share your source IP to the remote end and tell them to add that IP as rightsubnet._ In our example, we use 1.2.3.4 as source IP. It can be any public IP address. Start the tunnel afterwards.
sudo systemctl enable ipsec.service
sudo systemctl start ipsec
sudo systemctl status ipsec
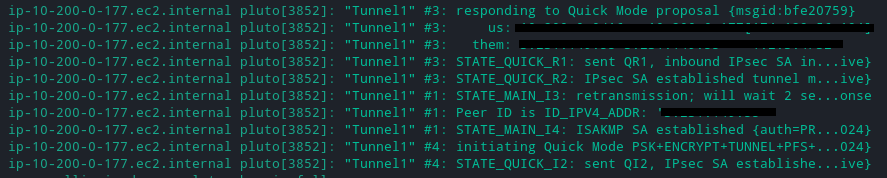
Tunnel1 is up.
Configuring NAT traversal
I want to send traffic from NAT instance to remote as if it’s coming from public IP 1.2.3.4. Of course it can be any IP of your choice.
In NAT instance, add an iptables rule. Configure the remote private subnet as destination and the source IP of your choice.
sudo iptables -t nat -A POSTROUTING -d 192.168.0.0/16 -j SNAT --to-source 1.2.3.4
sudo service iptables save
Now we will test the setup with tcpdump tool. For this, run below command in NAT instance.
sudo yum install tcpdump -y
sudo tcpdump -i any icmp -n
SSH into another instance which you provisioned in subnet 10.100.0.0/24. Ping to the remote private IP of the host from that instance. Assuming the remote private IP is 192.168.1.161. Ping result should success and you can see the tcpdump result in NAT instance.
[ec2-user@ip-10-100-1-102 ~]# sudo tcpdump -i any icmp -n
tcpdump: verbose output suppressed, use -v or -vv for full protocol decode
listening on any, link-type LINUX_SLL (Linux cooked), capture size 262144 bytes
13:33:49.373891 IP 10.100.0.182 > 192.168.1.161: ICMP echo request, id 4273, seq 591, length 64
13:33:49.374867 IP 192.168.1.161 > 1.2.3.4: ICMP echo reply, id 4273, seq 591, length 64
As you can see, traffic coming from 192.168.1.161 is being translated to 1.2.3.4
Also, if tcpdump command run in remote end, the following output will be generated.
[ec2-user@ip-192-168-1-161 ~]# sudo tcpdump icmp -n
tcpdump: verbose output suppressed, use -v or -vv for full protocol decode
listening on eth0, link-type EN10MB (Ethernet), capture size 262144 bytes
13:43:20.255914 IP 1.2.3.4 > 192.168.1.161: ICMP echo request, id 4273, seq 1161, length 64
13:43:21.256418 IP 1.2.3.4 > 192.168.1.161: ICMP echo request, id 4273, seq 1162, length 64
13:43:21.257498 IP 1.2.3.4 > 192.168.1.161: ICMP echo request, id 4273, seq 1162, length 64
13:43:21.259818 IP 1.2.3.4 > 192.168.1.161: ICMP echo request, id 4273, seq 1162, length 64
Traffics are indeed coming from source 1.2.3.4.