OpenLiteSpeed is a high-performance, scalable, open-source Web Server developed by Litespeed technologies. It is apache drop-in replacement as it can be replaced apache web server without any major change. OpenLiteSpeed contains all the essential features right out of the box from LiteSpeed web server. In WordPress, OpenLiteSpeed along with LSCache plugin is the best choice as it helps to reduce the server’s response time. Below we see the benchmark result from LIteSpeed blog where it shows how OpenLiteSpeed handles 10,000 requests over 100 concurrent users. The larger the number, the better.
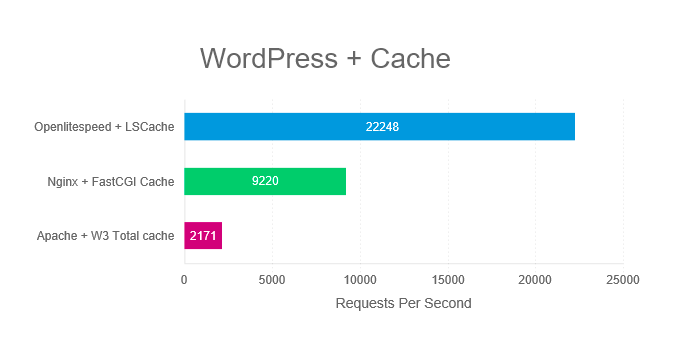
(Source: https://blog.litespeedtech.com/2018/03/05/compare-openlitespeed-to-nginx-and-apache/)
In this tutorial we will install OpenLiteSpeed Web Server, PHP 7.3 & MySQL. Also we tune the PHP configuration so that it performs better. Don’t worry. I developed a script that automate all the processes for us. This script currently works on fresh installed Debian 8/9 and CentOS 7 system.
Let’s begin
Install OpenLiteSpeed, PHP 7.3 with dependencies & MySQL
-
First login to your server via ssh.
-
Now get the root access
sudo su
- Download the OpenLiteSpeed installer script from the github repository
wget https://raw.githubusercontent.com/k4mrul/openlitespeed-installer-debian-centos/master/openlitespeed-installer.sh --no-check-certificate
- Setting the require permission
chmod +x openlitespeed-installer.sh
- Executing the script
./openlitespeed-installer.sh
Now the script will update the system and install the packages. After installing the mariadb, the script will prompt you to enter a default root password. By default there is no password is set. So simply press enter to enter into mariadb server and set/change new password by pressing ‘y’.
root@kamrul:~# ./openlitespeed-installer.sh
==================Updating system===========================

==================Installing openlitespeed with PHP 7.3===========================

==================Allowing firewall===========================

==================Tweaking PHP===========================

==================Install MariaDB 10.3===========================

Set mysql root password......

NOTE: RUNNING ALL PARTS OF THIS SCRIPT IS RECOMMENDED FOR ALL MariaDB
SERVERS IN PRODUCTION USE! PLEASE READ EACH STEP CAREFULLY!

In order to log into MariaDB to secure it, we'll need the current
password for the root user. If you've just installed MariaDB, and
you haven't set the root password yet, the password will be blank,
so you should just press enter here.

Enter current password for root (enter for none):
OK, successfully used password, moving on...

Setting the root password ensures that nobody can log into the MariaDB
root user without the proper authorisation.

You already have a root password set, so you can safely answer 'n'.

Change the root password? [Y/n]
y
New password:
Re-enter new password:
Password updated successfully!
Reloading privilege tables..
... Success!

By default, a MariaDB installation has an anonymous user, allowing anyone
to log into MariaDB without having to have a user account created for
them. This is intended only for testing, and to make the installation
go a bit smoother. You should remove them before moving into a
production environment.

Remove anonymous users? [Y/n]
y
... Success!

Normally, root should only be allowed to connect from 'localhost'. This
ensures that someone cannot guess at the root password from the network.

Disallow root login remotely? [Y/n]
y
... Success!

By default, MariaDB comes with a database named 'test' that anyone can
access. This is also intended only for testing, and should be removed
before moving into a production environment.

Remove test database and access to it? [Y/n]
y
- Dropping test database...
... Success!
- Removing privileges on test database...
... Success!

Reloading the privilege tables will ensure that all changes made so far
will take effect immediately.

Reload privilege tables now? [Y/n]
y
... Success!

Cleaning up...

All done! If you've completed all of the above steps, your MariaDB
installation should now be secure.

Thanks for using MariaDB!

And you have just install the openlitespeed web server.

=================>Openlitespeed has been successfully installed<==========================

Open web browser and browse http://SERVER_IP:7080/ and enter admin:123456 as login (don't forget to change the credentials from 'Webadmin Settings').\n

Thank you for using this script :)
Installation is success. Open web browser and browse http://SERVER_IP:7080/ to enter the web admin panel. The script should automatically get the server IP for you.
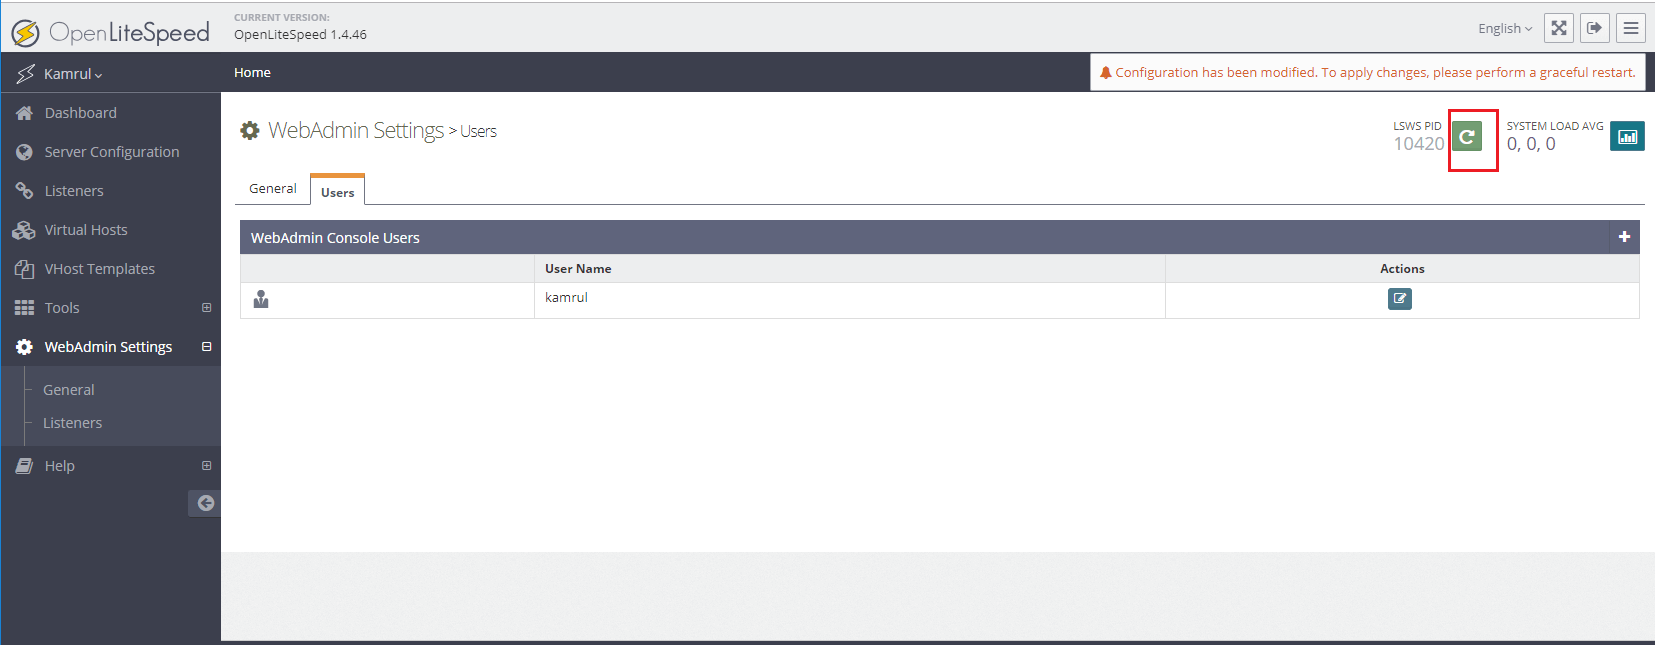
Changing default Web admin panel password
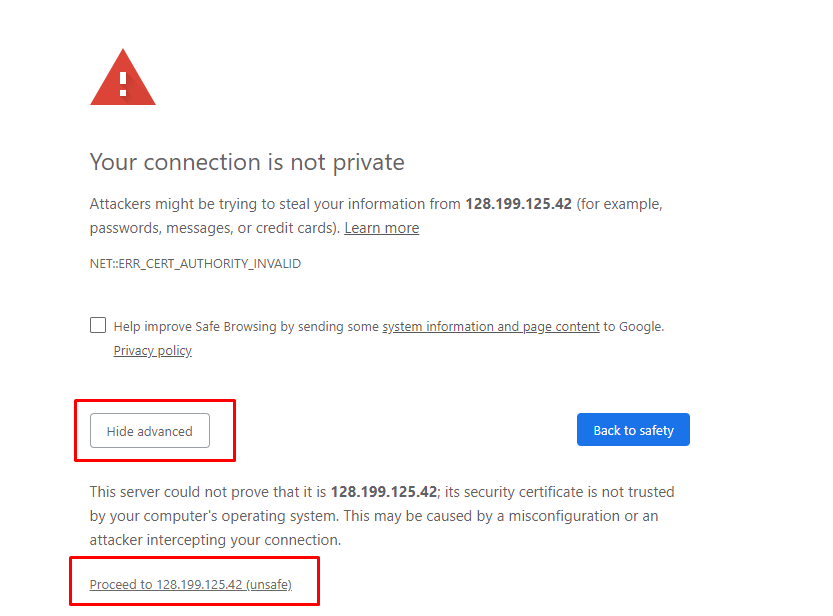
- When you will visit the web admin panel for the first time, you will see a warning. That’s normal as there is no valid SSL certificate is configured. Click “Advanced” and click “Proceed”.
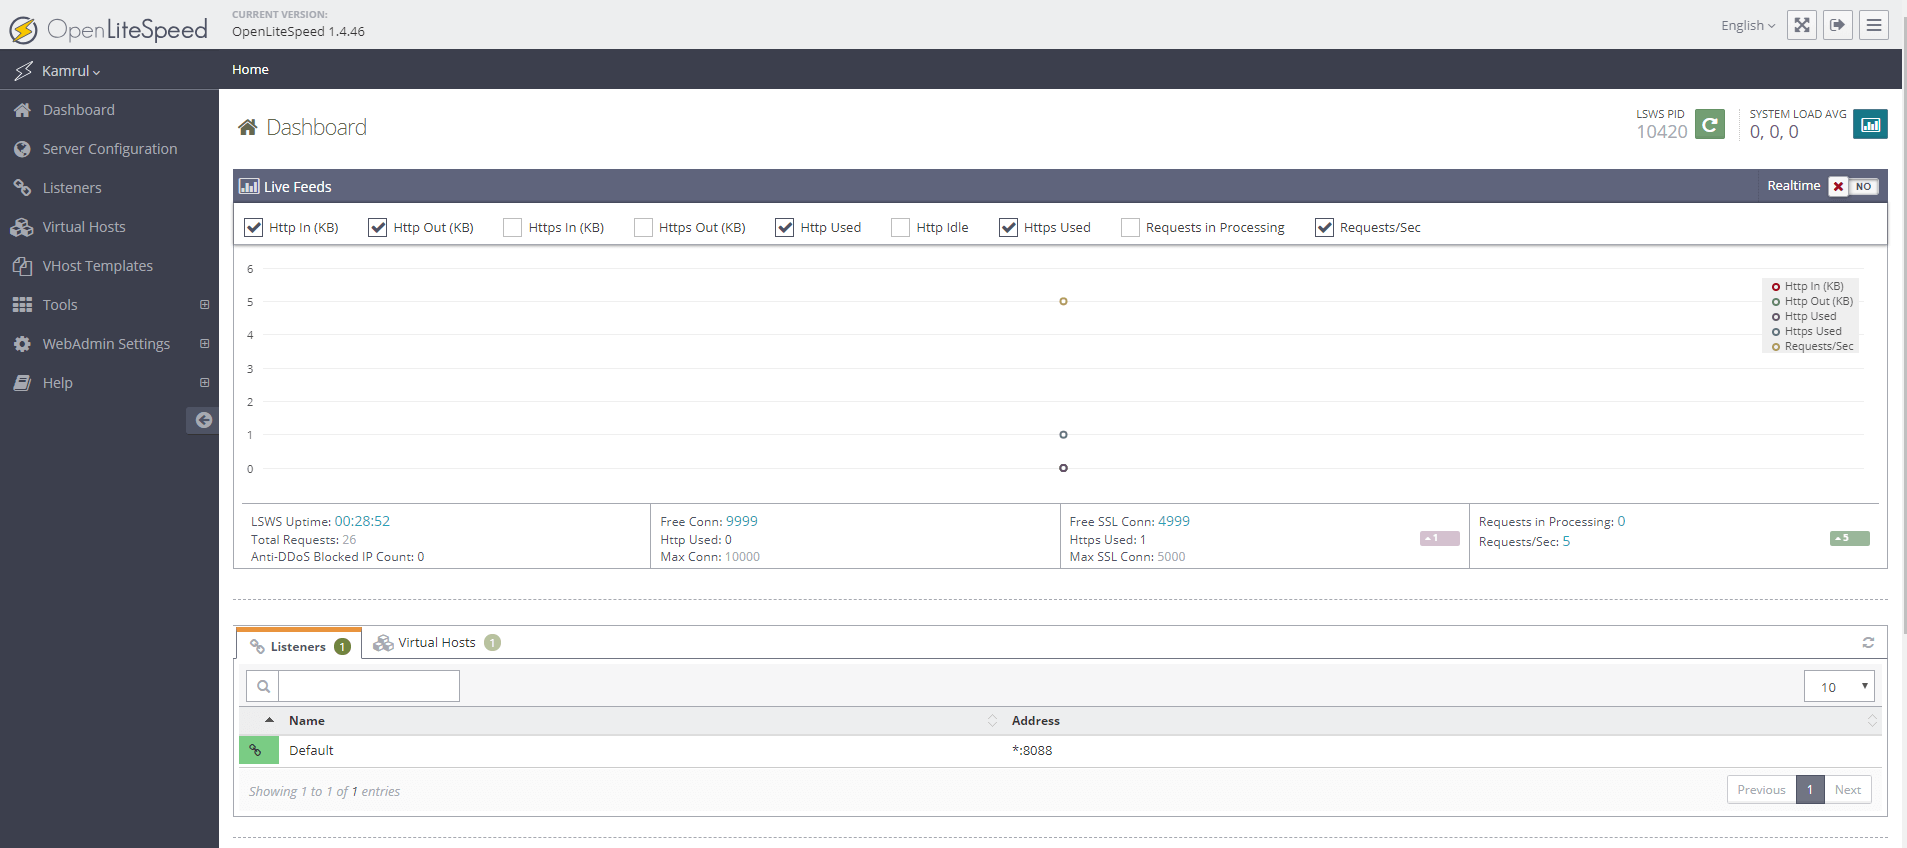
- Login as admin & 123456 & you will see the OpenLiteSpeed control panel
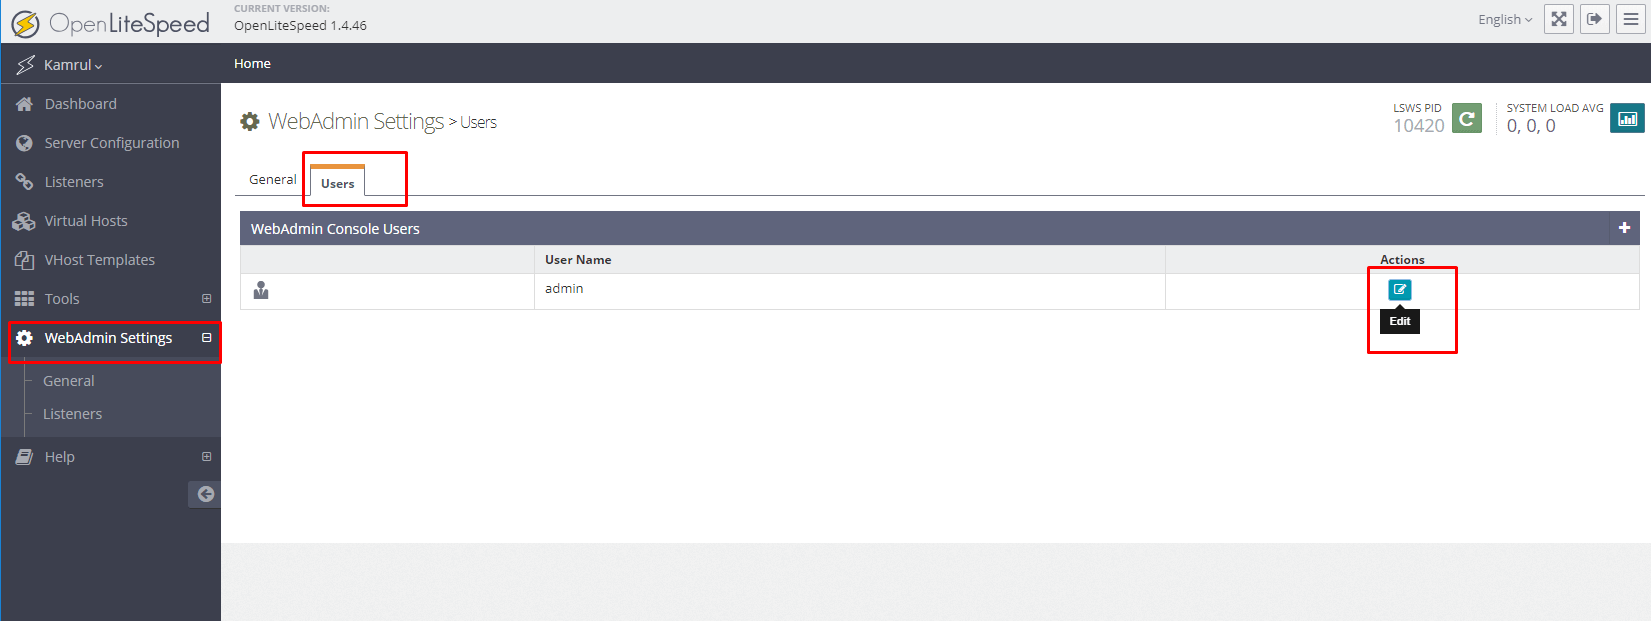
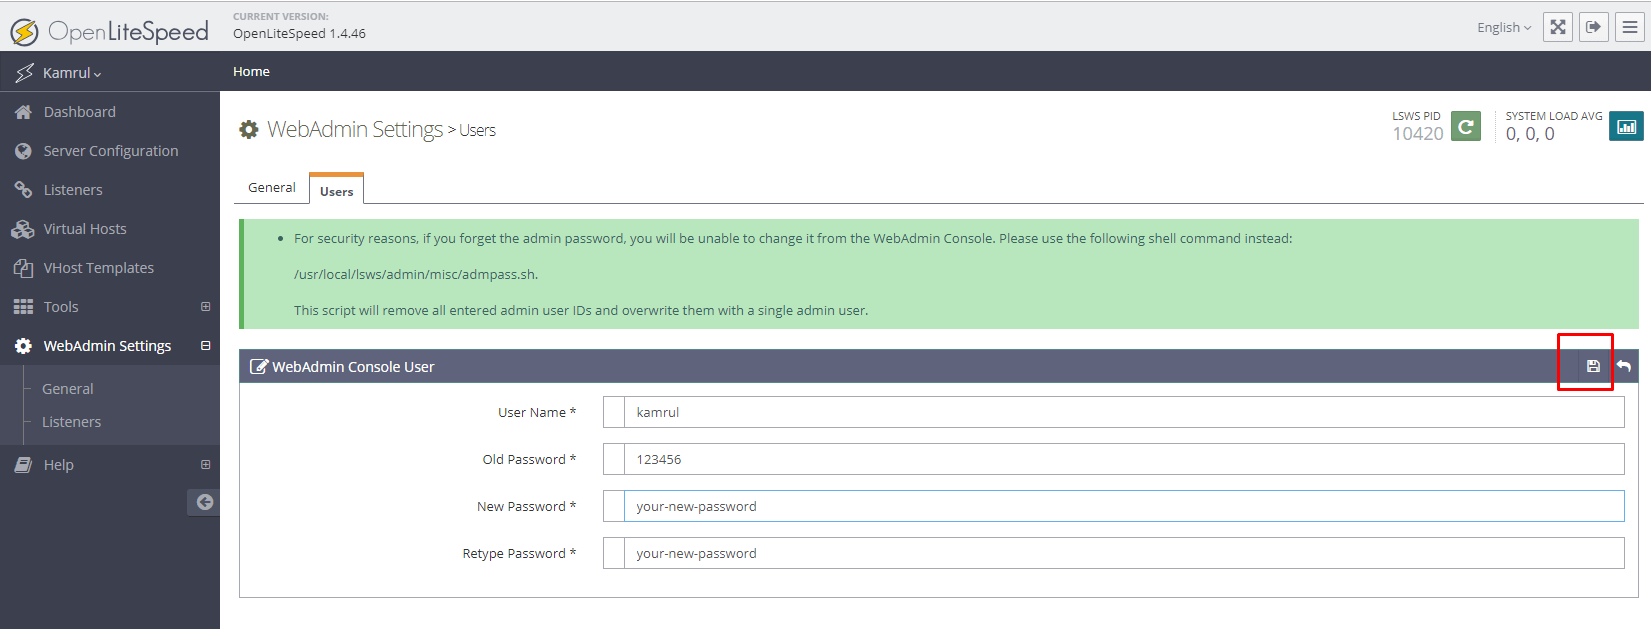
- To change the default credentials, click “WebAdmin Settings” from left panel and navigate to “Users” tab. Now click the edit icon.
- Now simply change your username and password. When done, click the save icon
Changing PHP version
Now we need to set the correct PHP version. By default OpenLiteSpeed uses PHP version 5. We need to make a few changes so that web server can use PHP version 7.3.
-
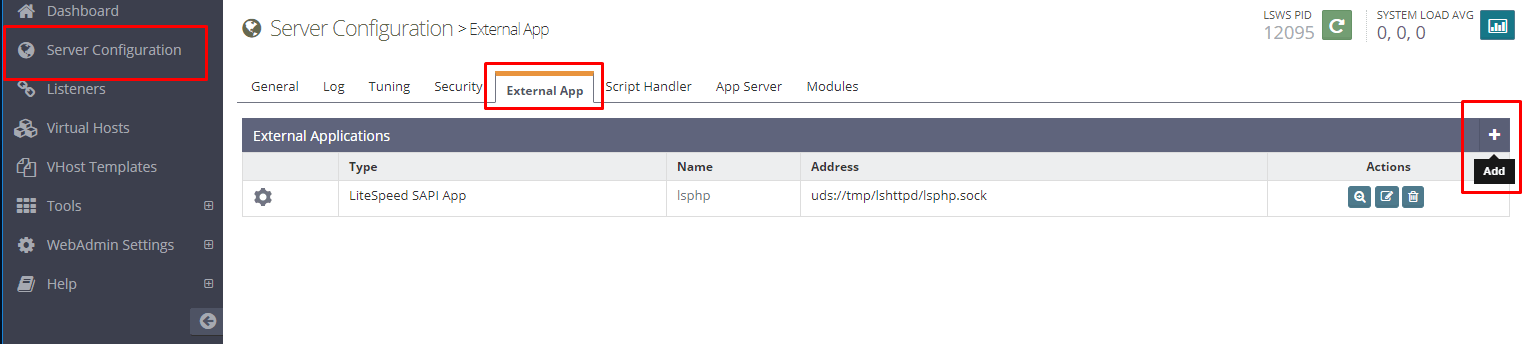
Go to “Server Configuration” > “External App” tab and click “Add” icon
-
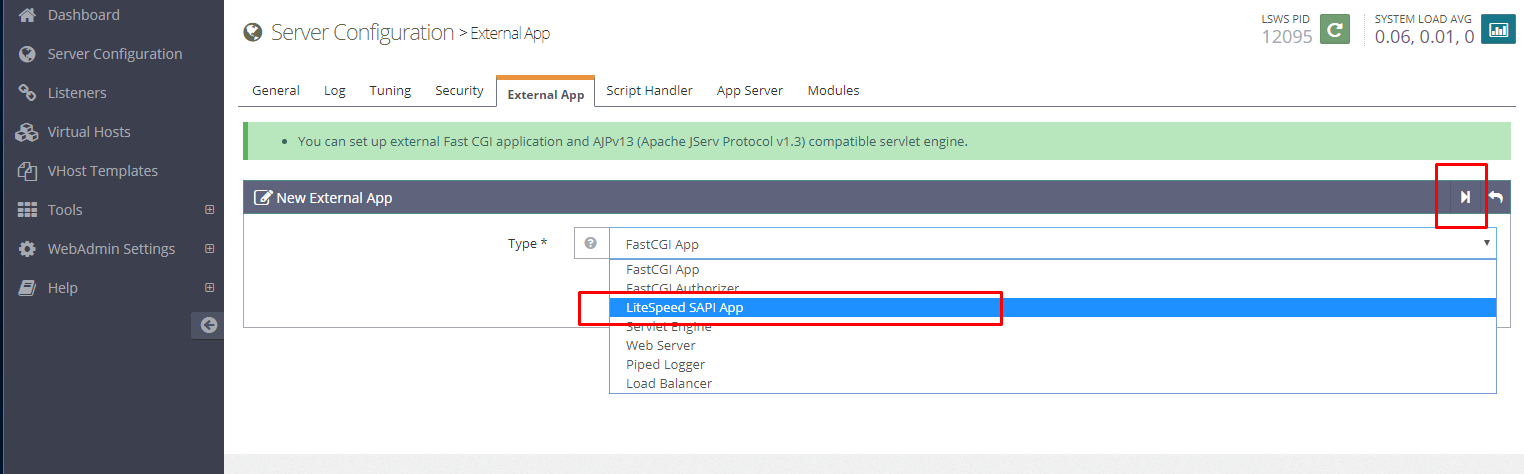
Select “LiteSpeed SAPI App” and click “Next”
-
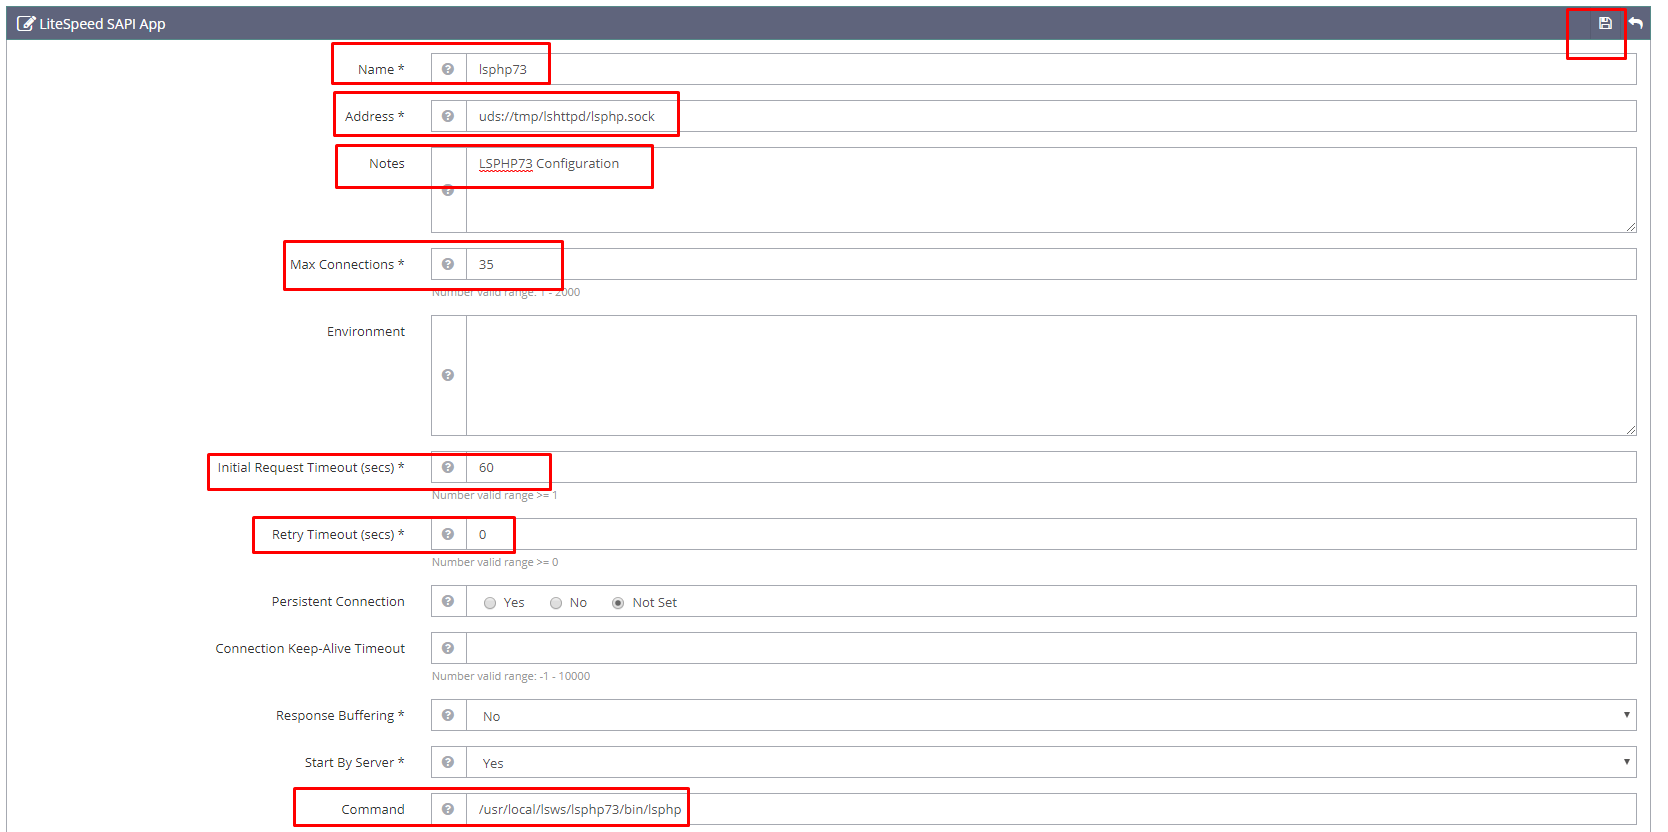
Now set the values like below:
Name: lsphp73
Address: uds://tmp/lshttpd/lsphp.sock
Notes: LSPHP73 Configuration
Max Connections: 35
Initial Request Timeout (secs): 60
Retry Timeout (secs): 0
Command: /usr/local/lsws/lsphp73/bin/lsphp
- Save the settings
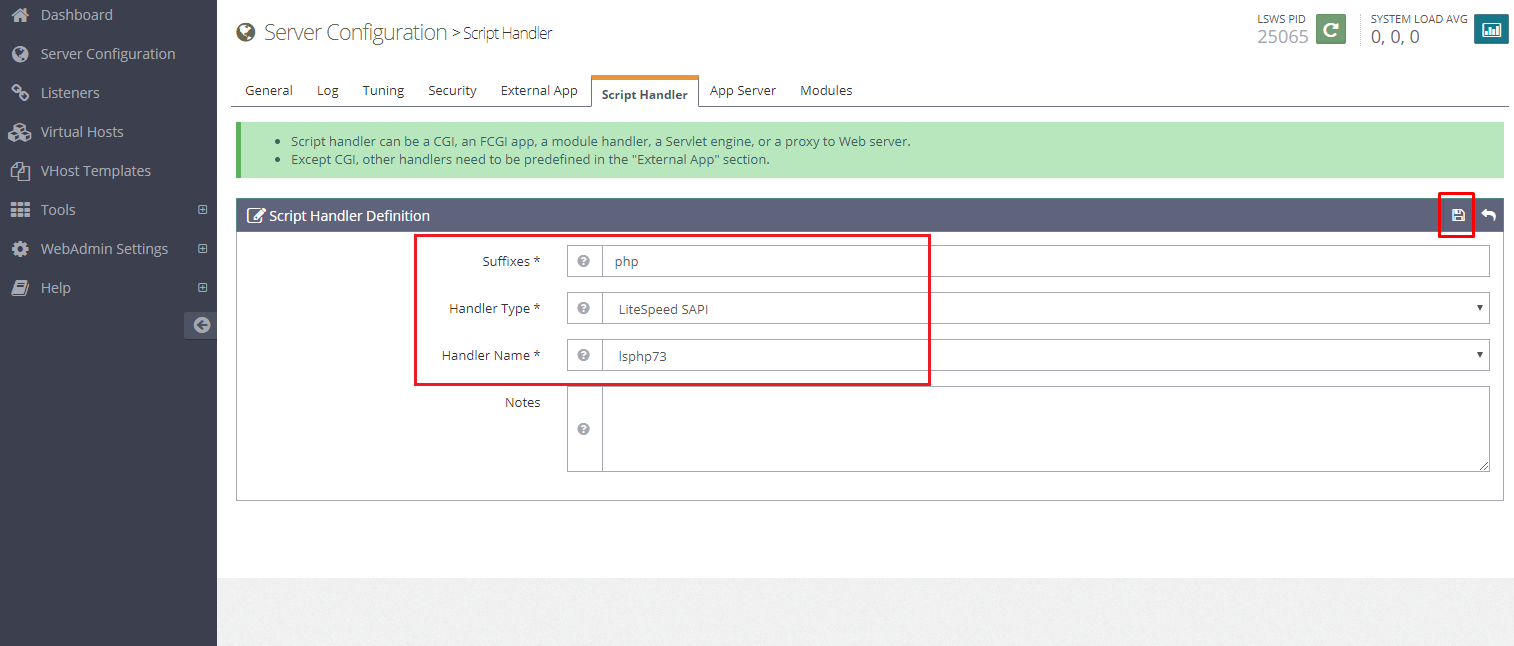
- Next, click “Server Configuration” > “Script Handler” tab
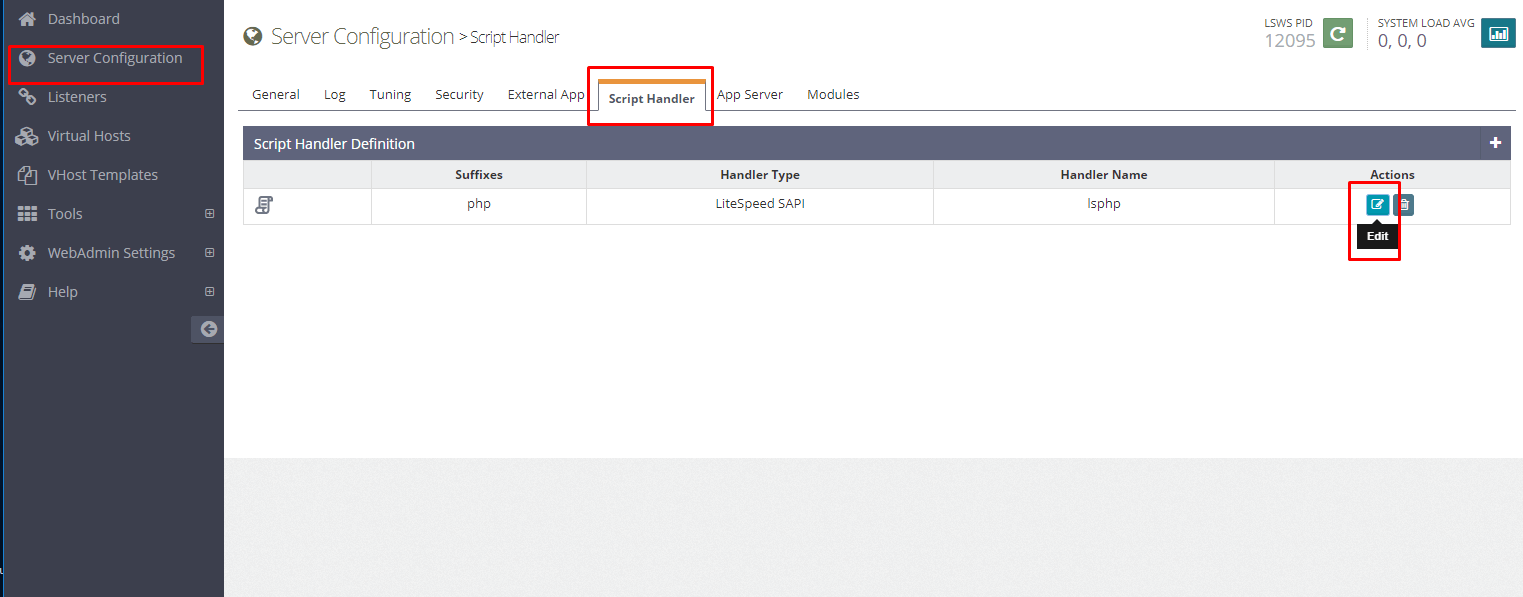
- Set required settings and click the save icon
Suffixes: php
Handler Type: LiteSpeed SAPI
Handler Name: lsphp73
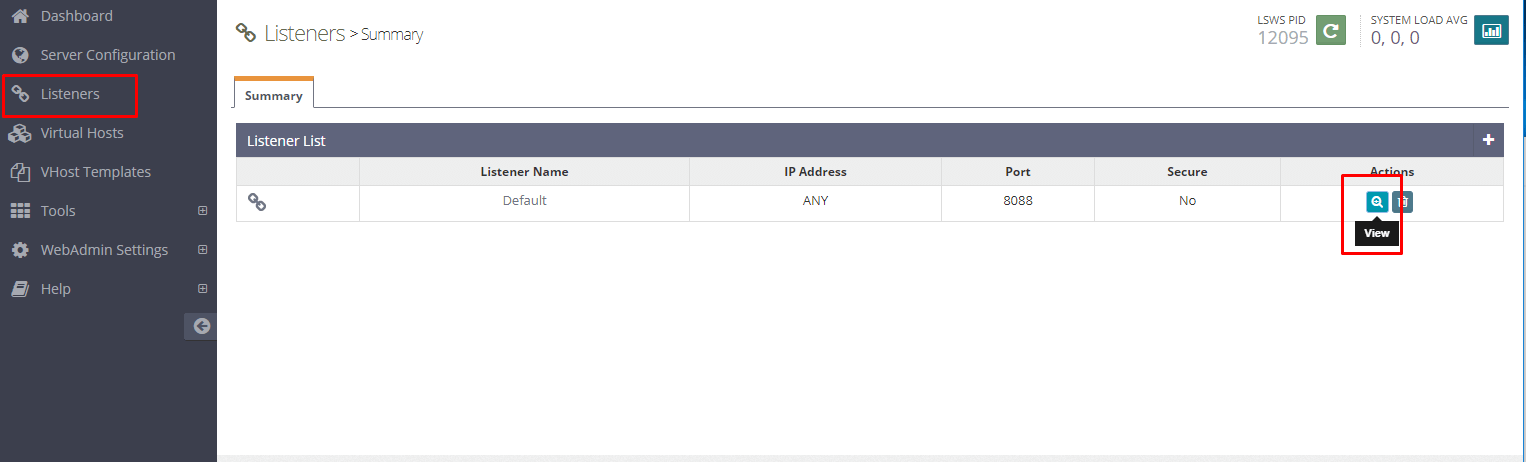
Changing OpenLiteSpeed default web server port
OpenLiteSpeed uses port 8088 for web server. However, HTTP normally listens to port 80. Let’s change the port.
-
Go to “Listeners” option from left panel and click “View” icon on the default listener
-
In the “Address Settings”, click edit icon and change the port from 8088 to 80. Save the change
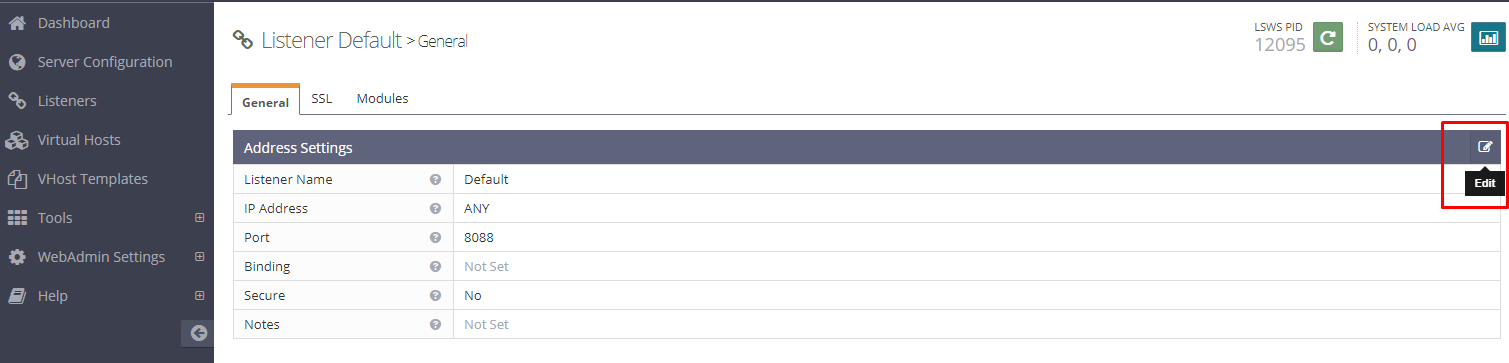
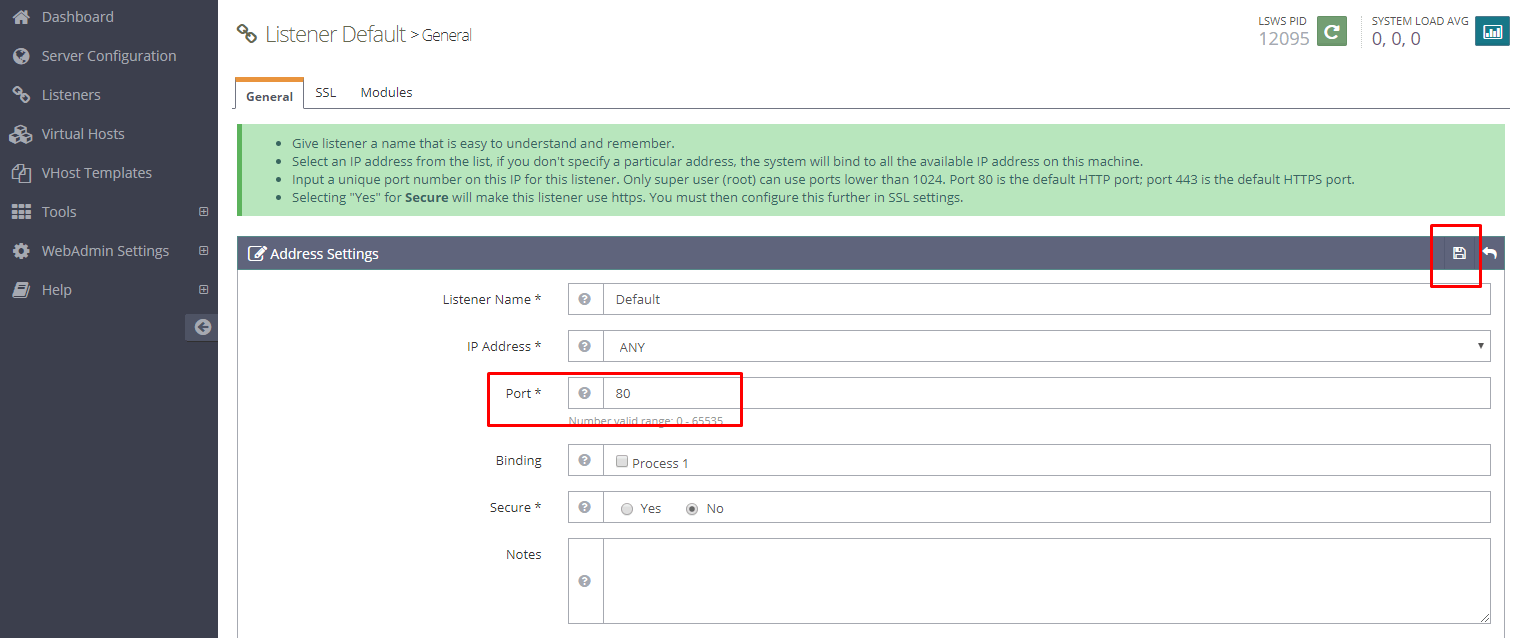
-
Finally click the “Reload” to apply all the changes
The server will restart gracefully and redirect you to the sign in form.
Optional steps
If you want to verify PHP version, you can type the below command:
/usr/local/lsws/lsphp73/bin/lsphp -v

Similarly, to check MySQL version
mysql -V

Congratulation! You have successfully installed OpenLiteSpeed Web Server in your system. Now you can either add a domain name or install WordPress on your server.